That's right - College Football Game Day! And not just "any" college football, but more importantly -
Notre Dame Game Day!
And the first one of the season at that!!
I've found that the best way to utilize the glue is to stick 3 petals together with one dot - it helps them all stand up. For example, the arrow below is pointing to a place where I put a dot of glue to hold the petals up. Do this a couple times till it looks the way you want it (this flower took just 3 extra dots of glue to hold the petals up).
And your flower is done! Now it's time to make the band and stick it all together.
Step #9: Cut out a band of fabric as wide as you want. Measure your baby's / friend's / own head to know how long it needs to be.
Now, I am a big fan of ND and all, but I still sometimes need me a little project-o to do whilst watching the 3 + hour game. Today, I decided to finally (Finally!) make Miss Mia a flower headband. (Something I thought I would have done 6-ish months ago or so).
And here she is in all her glory!
Her new trick is shoving her fist in her mouth, so I wanted to document that here. (i.e. I don't have many pics without her fist in her mouth).
If you want to learn how...Thiss is howw we doo iiiiit:
Materials:
-Fabric
-Needle
-Matching string
-Good Fabric Scissors
-Hot Glue & Gun (optional but helpful)
-Um I think that's it
-Oh! The TV tuned into ND / your fave team!
Step #1: Find some fabric and get to cutting. I decided to use an old, super soft t-shirt my husband was going to donate (sorry Goodwill). It's the perfect fabric for flower and headband making - stretchy, soft, good color, good condition, etc.
I cut up the t-shirt first so it's easier to cut in nice straight lines.
Step #2: Cut a long strip and fold it up into about 4-6 layers (or however many your scissors can handle). This should match about the size of flower you want to end up with. I like to secure with a pin to help the process go smoother but you don't have to if you are a Professional.
Step # 3: Cut out some petals. For most flowers I make it takes 11 petals. Sometimes I do the 5-clover type, sometimes the circle type, but this time I did 4-clover just because it's a small-ish flower and the style of the round petal is different.
They do NOT need to be perfectly symmetrical - I personally don't like to spend the energy on something nobody will notice, but it's up to you! I also like the slight variation in size.
Step # 4: This is where your creativity and practice comes into play. Take 1 petal (A) and fold it in half (B). Then fold it in half again (C), and sew to another petal (D). This "other petal" will be the base you sew all petals to.
Step #5: Keep going around 3 more times so you have sort of a circle. Again, this first layer does not have to be perfect.
Step # 6: Add a second layer with 4 more petals, placing the middle of each one on top of where two others meet. If that sounded confusing, see pic below...where these two petals meet (see arrow), place another petal smack dab on top. Then keep going around with the other 3 doing the same thing.
Step #7: Take your final two petals and sew them right in the middle - it doesn't matter where they face. You will stand them up in the next step..
Step #8: Take your hot glue gun (or if you are skilled enough with a needle and thread you can do this sans hot glue...but the hot glue is just so dang easy!) and your flower. Manipulate the petals to where you want them - stand up the middle ones, adjust some ones below, fan some out, etc. and decide where the glue will go.
I've found that the best way to utilize the glue is to stick 3 petals together with one dot - it helps them all stand up. For example, the arrow below is pointing to a place where I put a dot of glue to hold the petals up. Do this a couple times till it looks the way you want it (this flower took just 3 extra dots of glue to hold the petals up).
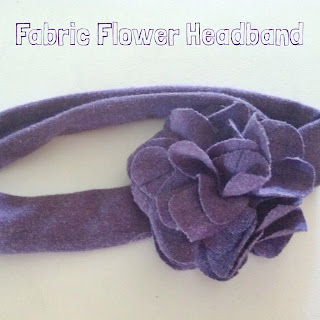
And your flower is done! Now it's time to make the band and stick it all together.
Step #9: Cut out a band of fabric as wide as you want. Measure your baby's / friend's / own head to know how long it needs to be.
Step #10: Connect the fabric to make a headband. I chose to use hot glue, plus some extra sewing for added security. You could probably do just one or the other.
Step #11: Hot glue the flower to the band in the same spot you glued / sewed the band together. Tadaa!
Now, back to the game. GO IRISH!


